Goodbye for now

 keep-calm-it-s-nearly-end-of-semester

(this photo was taken from this website)

The end is near and all I can say is, “Wow! Already?!”. Throughout this semester, this blog was been the most stressful yet the most fun and rewarding thing I could have done for a class. The thing I enjoyed most about my blog was it was 100 % me. Making a blog like this was something I’ve always wanted to do but never found time to do it. Now that I had to do it for a class it has benefited me even more. I have so much more knowledge under my belt about a number of things most bloggers would know nothing about. I never thought I would be become such an expert blogger and be able to put all these ideas in my head into illustration.

Using twitter for pretty much everything was interesting because I had so many of my friends ask me, “What the heck is FDOM?”, (since we had to hashtag that for everything), it gave me a chance to explain the class and what that particular project was about, and more often than not it really interested people. It made me feel good as well. While some people are complaining about math or science problems they dont understand, I’m over here tweeting my locations with pictures taking funny videos, and blogging some of my favorite topics. Some would hardly call that a class, though, looking back on everything I’ve learned, I’ve realized its going to benefit me greatly in the future. Especially with my major being Advertising, I’l already have a good understanding of the social media and digital world. If I could improve one thing it would be my writing style. I believe I’m very creative and have so many ideas, but I have a hard time putting them on paper and making them sound professional. But something I dont lack is being passionate. Being able to do all these different projects and learn so many things, I’ve developed a huge passion for it all. With my creative mind and knowledge of the new world we live in, I feel I can only go up on the meter of success in the future.

Huge thank you to Professor Zmikly and Kimberly Cook for being patient with all their students, believing in us, and always doing everything with a smile on your faces! Us students wouldn’t be able to be as passionate about this course if it wasn’t for the instructors rubbing off on us.


Friends-giving

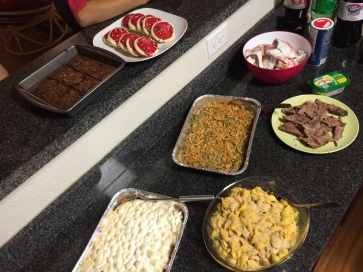
Hey y’all! I wanted to share something super awesome that my roommates and I decided to do this year before we all went home for thanksgiving. We decided to have a huge pre-thanksgiving dinner, and boy was it amazing! Everyone made a different dish and once it was all put together, it was by far the best meal I’ve had in college yet.

This is super fun to do, for multiple reasons. It gives you a chance to bond with your roommates. Whether you and your roommates are best friends, or were complete randoms like mine were, bonding in the kitchen is always a good time!

Alright well lets get down to it!

For our main course, Kelsey made Brisket:

IMG_0766

  • 4 lb brisket
  • Season with salt, pepper, and garlic salt
  • Wrap in foil with the fat on the top
  • Cook at 350 degrees for 3 hours

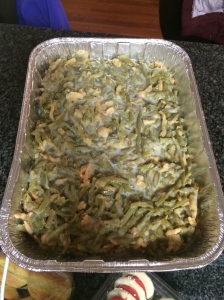
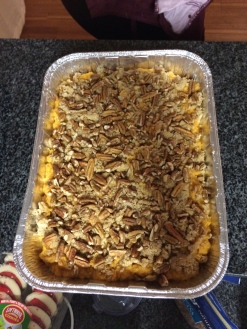
For the sides, we made Green Bean Casserole, Sweet Potato Casserole, and Mac and Cheese

Green Bean Casserole

IMG_0757

  • Use four cups of green beans and put them into a tin like the one we used
  • Add 1 can of Condensed Cream of Mushroom soup, 3/4 cup of milk, and pepper
  • Once that is all mixed together, add half of your french fried onions (2/3 cups)
  • Bake at 350 degrees for 30 minutes
  • Stir the cooked mixture and top it with the remaining 2/3 cup of fried onions
  • Bake for 5 more minutes or until it’s crispy!

Sweet Potato Casserole

IMG_0770

  • Combine sugar, butter, cinnamon, salt, nutmeg and ginger in a small saucepan over medium heat
  • Bring to a boil, stirring until sugar dissolves
  • Pour over potatoes that are already in the baking sheet and toss to coat them.
  • Cover the dish tightly with foil and bake at 375 degrees for 50 minutes
  • After that is done, take the potatoes out and increase the oven temp to 500 degrees
  • Top potatoes with marshmallows and nuts
  • Return to the oven and bake until marshmallows begin to melt and nuts begin to brown (3 minutes)

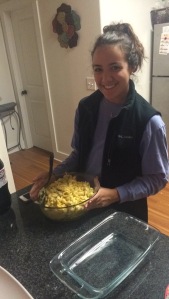
Here is Michelle and her homemade Mac and Cheese

IMG_0762

  • Cook macaroni according to the package directions. Drain.
  • In a saucepan, melt butter or margarine over medium heat. Stir in enough flour to make a roux. Add milk to roux slowly, stirring constantly. Stir in cheeses, and cook over low heat until cheese is melted and the sauce is a little thick. Put macaroni in large casserole dish, and pour sauce over macaroni. Stir well.
  • Melt butter or margarine in a skillet over medium heat. Add breadcrumbs and brown. Spread over the macaroni and cheese to cover. Sprinkle with a little paprika.
  • Bake at 350 degrees for 30 minutes. 

For this recipe in detail, go here

LAST but not LEAST, is dessert 🙂

We kept it pretty simple when it came to the dessert but it was definitely still enjoyable!

IMG_0765

Store bought brownies and icing cookies, always turn out to be a good idea! 🙂

IMG_0769

And there you have it people! Our Friends-giving Feast! As we were all in the kitchen cooking up this meal, I realized how thankful I am for my roommates. I moved to this city brand new at the beginning of the year. I moved into this house of girls who I knew absolutely nothing about other than the fact that they were all best friends, and I had no idea what to expect. But I took the risk and not only have they been some of the best roommates I could live with, they became some of my really close friends really fast. And I’m forever grateful for that!

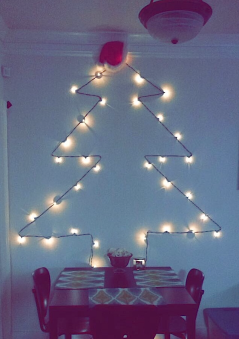
DIY lighted Christmas tree

Hey y’all!! So as you can tell I’m super obsessed with all things Christmas and I can’t seem to stop adding more and more decorations to our house. As I was scrolling through Pinterest like I do pretty much everyday, I came across this idea!

IMG_0751

It’s an alternative wall Christmas tree!

Whether you don’t have enough time, money, or room for an actual tree; this is the perfect idea!

All you’ll need is some string lights that you might have laying around your house wondering what your going to do with them (thats what we did) and a couple tacks or nails. Personally, I found tacks to be a lot easier considering this took us a very long time to finally get it even.

  • You start by finding the middle of the lights to make the point of your tree. You’re going to want to do this with another person so it’s easier to get it even.
  • You’ll use the lights to measure how big/wide you want the tree to be. For example, we started out with 2 bulbs on each side for the first branch, went in 1 bulb, went out again about 3 bulbs, and so on. You want to make sure you use the same length on each side.
  • Once your done, you nail it one last time and let it hang down to make the tree stump. And Viola! You’re done. Your very own lit up Christmas Tree.
  • We also added a Santa hat on top since we didn’t have a star or anything, but y’all can add your own flair to it too!

(For more ideas of different wall trees check out this site!)

But of course, knowing me, I wasn’t going to not have a Christmas Tree up. So thanks to my roommate, she brought an old Christmas tree and ornaments she already had and we put it right on up!

IMG_0752

And there it is! What is more beautiful than a lit up Christmas tree? Not much. (Oh, and say hello to our house cat, Firby) She insisted on making an appearance on the blog today!

Happy Holidays Y’all!

Ho Ho Ho Y’all

Hey everyone and welcome back to my blog! One of the most fun things to do during the holidays and really just whenever you want, is craft! I love anything diy because it’s just so simple! So to kick off December, I’ve prepared for y’all a short and sweet diy video demonstrating how to make this Christmas Themed Canvas!

29d0f94563a220399d4e408d04c20c11I found this adorable idea here on Pinterest and just had to try it out! Here it is and goodluck to all!

Passion Faux Fashion

When it comes to fashion, Fall and Winter have to be my two favorite seasons to dress for. Even if you dont have that many sweaters or warm articles of clothing in your closet, you can always mix and match different pieces to make a different outfit.

So, here I’m going to teach you how to mix and match with the infamous Faux Fur Vest

I love wearing my vest in the winter time because its super warm and you can wear it with just about anything!

IMG_5563.

I always go with faux fur because its less expensive and you’re not killing any animals just to make your outfit cute 🙂

 IMG_5568

First, I paired the vest with just a plain white long sleeve shirt. This is a super cute way to dress up the vest but still keep it casual. Add a pair of jeans and throw on some riding boots and you’re ready for the cold!

White V-neck shirt: Target

Faux Fur vest: Urban Outfitters

Boots: Francesca’s

IMG_5581

Next, I added a pattern to the fur. Like I said, just about anything goes with fur, stripes included! You can even go with a plaid shirt, polka dots, or really just any type of pattern you like to wear! Since I’m a huge stripes person, I personally love this look the best. I’m also wearing the same jeans and boots as before. Mixing and matching is so fun because just by changing one item it looks like a completely different outfit.

IMG_5588

And lastly, I paired the vest with a dressier solid color shirt. Still in the same boots and jeans, you can add a dressier button down shirt to spruce it up a little bit for a classier look.

And there you have it! Three different and easy ways to wear your fur vest for the fall/winter! I hope you enjoyed it as much as I did! For different types of faux fur vests visit forever21.com

It’s only November…

YES it is only November… but I couldn’t be more excited for Christmas time!

51yw6ScRGUL._SY355_

Food•Family•Decor•Winter•Big Sweaters•Hot Chocolate•Christmas Lights

Just a few of my favorite things about Christmas– but one of the things I enjoy the most is, of course, decorating!

So, took it upon myself to get a head start on getting my house into the holiday spirit!

So I took myself over to my favorite store in the world, HOBBY LOBBY, and went. crazy.

This slideshow requires JavaScript.

Now, as a college student, I know how hard it is to have a love for decorating & the holidays, and still stick to a budget. And thats what I love about Hobby Lobby. Just about always they are always having sales. So getting to knock off half the price on a couple of these things really saved me. Also, going to stores like Walgreens/CVS/Target even the Dollar Store, you’re guaranteed to find amazing decor and accent pieces for any holiday or occasion.

Venture here for coupons for half off Christmas Decor and other items at Hobby Lobby

My Closet App

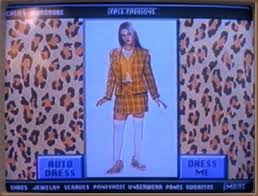
So if you grew up watching the movie Clueless like me, you always dreamed of having that awesome closet spinner/outfit-picker-outer technology like Cher did here

imgres imgres-1

And thats exactly where I got my inspiration for my app!

Introducing, MY CLOSET!

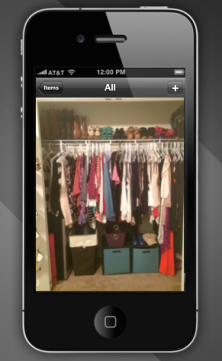
Screen Shot 2014-10-19 at 11.30.32 PMScreen Shot 2014-10-19 at 11.38.37 PM

The app that has every single clothing item, shoes, accessory- you name it- that you own! My closet allows you to program all your clothes into the app while you can switch between outfits to see how it looks on you. Say goodbye to spending 30 minutes picking out an outfit and having your room look like a total disaster. My closet is here to help. Using this app, you’ll be able to sift through your wardrobe and pick out exactly the type of outfit you’re in the mood for. You’ll be able to use your mannequin to see first hand how the outfit will look on you. This will definitely be the ideal app for all woman, and even men!

It’s Fall Y’all!

This year, September 23rd marked the official first day of Fall and boy am I excited! Its the start of my absolute favorite time of the year! Not only does the weather start to cool off, but it gives you more and more reasons to craft, decorate, and my most favorite, BAKE!

IMG_9645

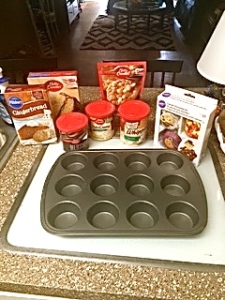
Today, my friends and I decided to go all out of bake a ton of Fall festive goodies and decorate them. As you can see we have different types of cakes, cookies, icing, sprinkles and more! I’m going to show you step by step how to make the most delicious desserts.

My job today was to make the Yellow Cake, and although we took the easy way and made them out of a box, it turned out DELICIOUS! ~ But why wouldn’t it?!

IMG_9656

So here’s the cake we will be making today. With boxed cake mix like this you can either make a full cake or distribute them into individual cupcake tins like we did. All you’ll need for this recipe is:

  • Betty Crocker Cake Mix
  • 1 Cup Water
  • 1/3 Cup Butter, Softened
  • 3 Eggs

** TIP! Preheat your oven at the very beginning so it has time to heat up! For this recipe you’ll need to preheat your oven to 350°F. **

IMG_9651

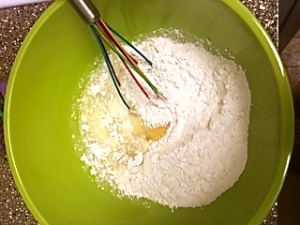
After you mix in all your ingredients, beat or whisk the mixture till all the lumps are out and its a nice smooth consistency.

IMG_9655

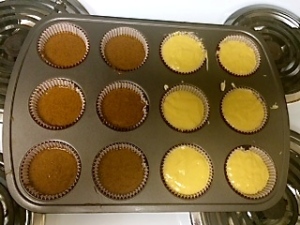
Next, your going to pour them evenly into the cupcake tins. We had two different kinds of cakes so we did a couple batches of half and half.

Once your oven has reached the desired temperature, stick them in the oven. For these cupcakes we put the timer on for 15 minutes and periodically checked on them.

IMG_9659

TADA! Our perfect little cupcakes are out ready to be decorated. (Make sure you let them cool for at least 15 minutes before decorating). Now you can decorate them however you’d like, but we had multiple options of icings and other decorative items so we went a little crazy!

IMG_9664

And there you have it! The finished product. Yellow cupcakes on the left, Gingerbread cupcakes on the right, and White Chip Macadamia Nut cookies in the back. It’s safe to say I’m now in a sugar coma, but boy were they delicious!

I hope everyone enjoyed baking with me! I know I did. Stay tuned for more recipes and tutorials I might share 🙂 For more of my favorite Fall recipes, click here 

Channeling my inner Interior Designer

Ever since I started college and got to live on my own, I’ve developed more and more of a passion for Interior Design. Although, moving into a different apartment each year (this year being the third), it’s quite enjoyable to me to be able to start fresh with some new ideas. Since moving into my new house here in San Marcos, I’d have to say its my favorite one I’ve decorated so far. I feel I have a lot of talent when it comes to decorating and a pretty good eye for what is supposed to go where and what flows right with the proper environment. So I decided to share pictures and techniques with how I started from the ground up with my new place.

IMG_8259

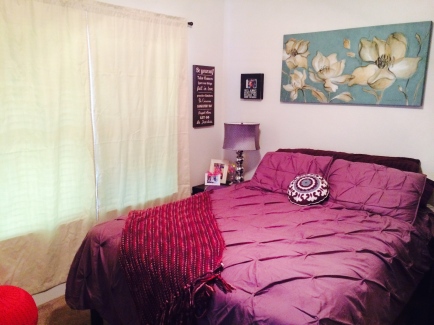
So here is the first thing you see when you walk into my room. Of course the main part of your room is going to be your bed so you want to make it look cozy yet elegant. (#1 tip my mom always taught me, never leave the house without making your bed). You want to have a few basic colors that go together yet contrast well that you can incorporate throughout your whole room. To be completely honest, I bought my bed spread/decorative pillow, flower painting and lamp all separately and they ended up looking perfect together. I love how the blue painting brings out the blue in my little decorative pillow.

  • Duvet cover and lamp: Tuesday Morning
  • Decorative pillow: Target
  • Painting: World Market

Something else I really enjoy having around my entire room are pictures. I LOVE pictures. I think having a ton of pictures of my friends and family really adds a ‘homey’ feeling to your room. Not to mention their always great memories to look back on. You’ll see what I’m talking about in these next few photos. 

IMG_8260

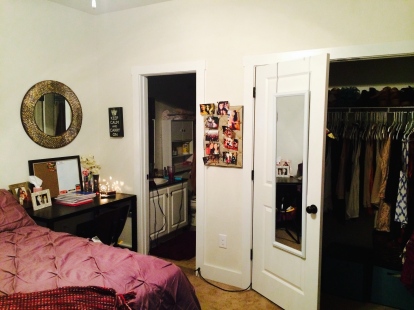
Here is a view of my desk area and of course, there it is- a bulletin board full of pictures. A mirror over your desk is something perfect to have to tie your whole room together, or even a little space like this. Unlike some people, I actually use my desk to do homework and school related assignments, but I like to spruce it up a little bit and make it an enjoyable work space. Adding more picture frames, a vase with flowers and even some desk essentials will really make this space complete. Another bulletin board or dry erase board is also always good to have by your desk so you’re updated with any upcoming assignments or events you need reminding of.

  • Mirror and picture board: Hobby Lobby
  • Half bulletin board/half dry erase board: Target
  • Hanging full length mirror: Target

IMG_8258

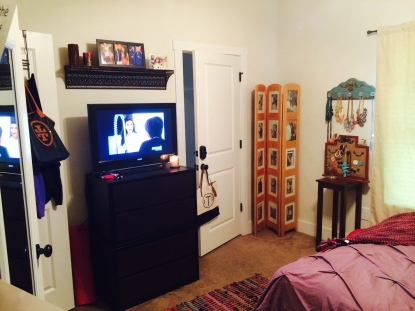
And here is the partial view from my bed. Now to me, a TV is essential. I’m a huge TV/Movies/Netflix person so I’m all about a TV. I put a shelf above my TV for more space to display pictures and any other decorative items you might not have space for. And again, more pictures. We had this stand up frame in my house in Houston, for YEARS and no one ever touched it or even bothered to put pictures in it. So I decided to adopt it and its been the greatest addition to my room!

  • Shelf: Garden Ridge Pottery

IMG_9630

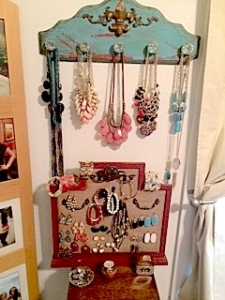
Last but not least: another one of my most treasured things in my room is my jewelry display. I absolutely love jewelry and love collecting it even more. If you have as much jewelry as I do, I suggest you invest (or make yourself!) something like this to display/organize your jewelry. It’s perfect because not only is it organized, but you have a good first look at everything you have.

  • Both jewelry displays: Hobby Lobby

So there you have it! My new and improved room. I hope I’ve inspired and given tips to anyone looking to spice up their decorating skills a little bit. It’s all about learning and trying new things so don’t be afraid to go out there. After all, its YOUR room. Make it your sanctuary.

~Want to know where I get some of my inspiration from? check out cococozy.com

Keep Austin Weird

There’s no doubt about it that Austin is one of the most unique cities in Texas. There are so many amazing things to do whether you’re a part of the night life or the outdoorsy life. For me, it brings out my inner adventurist. When I visit, all I want to do is explore, go hiking, or just do something awesome outdoors. Especially during this time, at the start of fall, the weather couldn’t be more perfect. One of the places my friend and I discovered over the weekend is called Castle Hill.

IMG_9042

From the looks of it, you might think a bunch of people just took over the entire space and just did whatever they wanted with it. Though, after doing some research of my own, I learned the history and now purpose of this so called kept secret. IMG_9045

While Castle Hill was initially used for housing, nothing was ever actually done to it. Leaving this place looking much different than it does now, completely plain concrete walls just waiting for someone to come make it their own. It wasn’t until 2011 that is was crowned the title HOPE Outdoor Gallery. Instead of penalizing those who came and started painting, property owners saw an opportunity to keep Austin weird and support the local community by allowing the space to be used as a sort of inspirational message board.

IMG_9047 IMG_9044

While climbing our way up this giant hill (which is much more difficult than it looks), we discovered the most amazing graffiti like artwork I’ve ever seen. Getting a closer look at it, you see its not all about people coming and vandalizing this area for no reason, but it’s a place where true artists can freely come and express their work.

IMG_9056

Lastly, and one of my favorite parts about this place, the view. Just turn around and you’ll see the beautiful city of Austin, Texas.

For more information and inside about what Austin has to offer, click here.